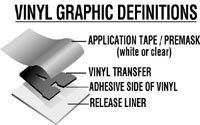
Overview |
Why More Important Than Ever! |
Step by Step Instructions
|
Tools required: masking tape, scissors, squeegee, lint-free cloth, TFX® CLEANER, ruler.
Application temperature should be above 50° F (13° C). If extremely cold, move to an enclosed area and allow the surface temperature to warm. If extremely hot, move to a shaded area.
Please refer to TFX Pro System for specific temperature recommendations.
|

|
 |
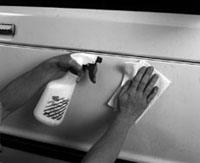
Step1
Clean the surface with TFX® CLEANER or a few drops of grease-cutting
liquid detergent in water (do not use a petroleum base cleaner).
Rinse clean with fresh water then dry with a lint-free cloth.
Wiping surface with alcohol will also help remove any contamination
and enhance the adhesion process.
Please refer to TFX Pro System for additional cleaning procedures. |
 |
Step 2
Put a piece of masking tape on each end of your vinyl transfer
in the area where you plan to apply it and anchor each end to
the application surface with masking tape. |
 |
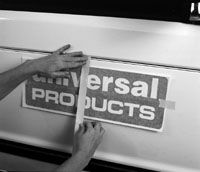
Step 3
Estimate the center of your vinyl transfer and place two vertical
lengths of masking tape to secure the vinyl transfer and create
a center hinge as shown in the illustration. This step allows
you to apply half of the vinyl transfer at a time. |
 |
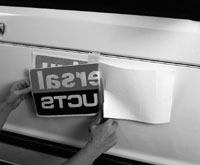
Step 4
Remove the masking tape anchor from one end of your vinyl transfer
and SLOWLY peel the release liner away towards the center masking
hinge. Be careful not to touch the adhesive side of the vinyl
transfer. Use scissors to cut away the excess release liner and
discard. |
 |
Step 5
Hold your vinyl transfer by the application tape, careful not
to touch the vinyl adhesive to the application surface until
you are ready to squeegee. Beginning at the center hinge, make
easy overlapping, pushing strokes with your squeegee. Remove
the center hinge tape and slowly peel the remaining release liner
away. Squeegee the other half of the vinyl transfer, working
from the center to the edges. |
 |
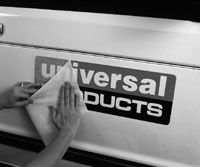
Step 6
To remove the application tape, peel SLOWLY at a sharp (180°)
angle. If the vinyl appears to be lifting, gently push the application
tape in the opposite direction from which you were pulling and
resqueegee that area. If after removing the application tape,
air bubbles are apparent, puncture the vinyl with a pin or needle
(DO NOT USE a knife or razor blade) and squeegee out the air
towards the puncture.
Please refer to TFX Pro System for additional application procedures. |
Wet Application Method:Spraying POSITION PERFECT onto your application surface will delay the adhesive activation between the bonding surface and vinyl transfer, resulting in a bubble-free, wrinkle-free application. CAUTION: Wet application may delay the immediate removal of the application tape. A waiting period of up to 30 minutes may be necessary.